I just finished my second organization project off the summer! I am so proud of myself for following through with my plan this time... maybe I will become a grown-up one of these days :-P
Well, on to my project as promised.
I stared off with my old set of drawers that roll (used to roll until my husband broke off a wheel bringing it home for this project :-/).
 |
| Just a plain set of drawers |
I selected the following paper to match the color scheme in my classroom. I got this paper in a paper basics pack from Hobby Lobby. They have all paper on sale for 50% off rigth now!!! A great find.
 |
| Don't you just love the colors and the mix of patterns? |
Then I started to cut the paper and ended up cutting it about 10 times! My goal was a really tight fit and I kept adjusting until I was down to the dimensions listed below. Others have suggested using wax paper for doing this, I would have, but I was out at home :(
 |
| Large Sides: 3 x 11 1/2 Front large piece: 2 1/4 x 8 3/4 Short pieces: 1 1/4 x 2 3/4 |
Finally I began to add the paper to the drawers. I started with placing "small pieces of tape" along the edge of the drawer as stated on other blogs were people have posted about this same project. However, I had a small problem. You might not be able to see from the pictures, but the wide scotch tape I was using actually crinkled the paper and left messy looking tape all over the drawer.
 |
| Can you see the crinkled paper? |
 |
| Looks Messy!!! |
My next thought was to use Mod Podge, as suggested by another blog, but I was a bit afraid of the learning curve from this application, so...
I brought out the big GUNS!!! As you may or may not know, I also love to scrapbook. As part of my supplies I have my favorite tool, my ATG gun, and when I say gun I mean GUN!!! Even though I may get made fun of at crops for how big it is, I love this tool and it was perfect for this project.
 |
| And don't you LOVE that it is pink! |
|
|
|
Here are the after pictures from using my ATG gun. I love how clean the paper looks in each drawer.
 |
| Add a small amount of the strip of tape on all sides |
 |
| Clean look on the outside |
 |
| No extra tape on the inside!!! |
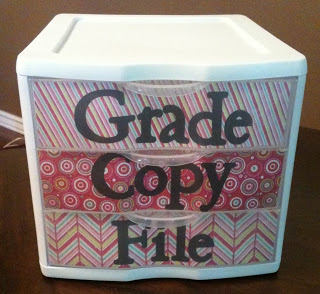
Finished drawers
 |
| I love how it looks from the front |
|
|
 |
| I like the side, but I might add a piece of paper in the small section I left empty. This will be under my desk most of the time, so it won't really matter, but would just add to the look. |
Finally, I added black vinyl for a crisp look to the letters. I cut the font on my Cricut using Pooh Font.
I have two drawers for "tools" as I call them with my students. Since we don't have a traditional desk in my school, I will add organizers and put all my supplies in the top two drawers. The rest are to keep myself, my co-teacher, subs and any paraprofessionals that come into my room organized and able to help out when needed.
I hope I could inspire you to update your storage units as well, next up...my many files (SHUTTER WITH FEAR! )


