Tuesday, February 24, 2015

New Rules

Is it completely crazy to add new rules in the last 31/2 months of the year?  I suppose it is, but the group I have this year has really thrown me for a loop, in many interesting ways.  SO...what's a girl to do when your class has tested all your tricks??? Get new tricks, right?!?!

Insert Whole Brain Teaching!  I have begun to research and understand how it all works. Baby steps to using the whole idea, if I ever adopt it all, but I am for sure posting and teaching the "5 RULES" in my classroom tomorrow.  To be honest, they are not really NEW rules, but more explictly taught.  I have to our PBIS expectations (but that is for a different post!) these rules will just help with the daily function and management of my students.

The main thing I LOVE about WBT is the hand gestures. This is something I already do for myself, but I am making an effort to use a gesture for every thing.  I started using them for lining up my kids today and it was AMAZING!!! They were so focused in the hallway and followed all the expectations perfectly!!! YES!!! No more saying the same expectations over and over while we are traveling in the hallway.  I just said a students name quietly, did the expectation gesture and mouthed the rule and they had to repeat it.  One reminder and they fixed the behavior.  I am so excited to see how this goes tomorrow.  I created some posters to use in my room to help them remember what the expectations were before we leave the room.  I will share when I create a credit page for the clip-art I used.

   Until then, here is the link to the cute 5 rules page that I found on Pinterest from Sunny and Bright in First Grade.  Do you use WBT?  How does it work for you?

According to Jeff Battle, Director, North Carolina Whole Brain Teachers:

Rule One: Follow directions quickly! (the gesture: make your hand shoot forward like a fish)

Rule Two: Raise your hand for permission to speak (the gesture: raise your hand, then pull it down next to your head and make a talking motion. This rule will be the most commonly violated. See below for how you stop this without criticism or negativity.)

Rule Three: Raise your hand for permission to leave your seat. (the gesture: raise your and, and then make a little walking figure with your index and middle finger.)

Rule Four: Make smart choices! (the gesture: tap one finger to your temple as you say each word.

Rule Five: Keep your dear teacher happy! (the gesture: hold up each thumb and index finger out like an “L” framing your face; bob your head back and forth with each word and smile really big!)

Tuesday, February 17, 2015

Valentine's Day Party Fun

Friday February 13th we celebrated Valentine's Day with our annual party.  I was looking for some easy party ideas and games to make the afternoon festivities go smoothly, but pack in a ton of fun.  I found several games and the craft we did at: MomSwimBikeRun.  She shared all the fun Minute to Win it games we played (Cookie Face, Cupid's Bow and Arrow, and Marshmallow Toss) and the Heart Goggles craft that my 3rd Graders actually loved to create.  We did all the activities in stations and rotated to help my darlings follow directions better.  I had planned on doing the candy heart stacking game, but we ran out of time.  I meant to get pictures of all the games, but we were having so much fun that I did not get any of cookie face or marshmallow toss.  They kids decided to save their cookies from the floor by doing the game over their desks (so smart!) and I bought heart shaped marshmallows instead of miniature ones, which added a level of difficulty, but made it fun in a small space.  We started the party with a snack and passing out our valentine cards, then we played the games, and wrapped up with our photo booth and voted on our favorite Valentine box to put on display in the art display case.

Heart Goggles
Our Favorite Valentine's Box

Second Place
One Mom brought in a ring toss game and prizes


Heart Goggles and Cupid's Bow and Arrows Game

More Cupid's Arrows


Photo Fun
Photo Booth

Even the Mom's got in the booth!
Total our party was an hour, and it was perfect! Share in the comments some of your favorite party games!

Thursday, February 5, 2015

Where have I been??? Plus a Tech Tip!

It's been a year while since I posted on here.  Life has been so busy. Going from 1 kid to 2 took it's toll on me.  I had a difficult pregnancy with my 2nd baby, I was sick for almost the entire pregnancy, very tired and ended up having my gallbladder taken out when baby #2 was 8 weeks old.  

Aren't they cute!


Now that G is almost a year old, life is settling into a new routine and I plan to get back to blogging a about what is happening in my classroom! For today, I want to share a quick tip for a new app/website that my technology integration teacher shared with me.  Plickers! My kids LOVE it.  It is so simple to set up, print the response cards and download the app.  You create questions for the kids that show up on your smartboard or projector.  The kids use their individual card to select their answer.  Then you can revel the correct answer and you can immediately see who understood the lesson, and who needs reteaching, or if the whole class missed the concept.  Plickers is available on android or apple products and you only need one device to make it work!

View from the camera on your phone or tablet
See immediate results!!!

Sample of the student Cards

The plickers website definitely could use some updates that would allow teachers to print results and the ability to put picture into questions, but I have heard they are working on adding some of these features in the future.  Regardless, as soon as my students pull out their plickers cards, engagement goes from a few to 100% participation.  The immediate feedback for the students is a huge benefit and I am hoping that after our next assessment, I will see a major improvement in student achievement. Hope you find this site as useful as I have!

Thursday, June 27, 2013

Bloglovin! and Catch-up Post

As you may or may not know, Google Reader is going away July 1st.  So, many bloggers are switching to Bloglovin.com.  I reluctantly made the switch (I was sure it was going to be a pain in the butt to switch all my blogs and to add a new follow me button), but it was SUPER EASY!!!  Follow THIS LINK to the website and follow the same easy steps I did to link up all my blogs from Google Reader. 
*Don't forget to CLAIM your blog and get your followers to join you on Bloglovin'.*


I am not doing a giveaway with this link up, but there are many other bloggers who are, so don't miss out!!!


Don't forget to follow me over at Bloglovin.com:


Finally-I know I haven't posted in a week, but the SUMMER Crazies have taken over my house. Little bit-Miss R is getting tubes next week :( , bridal shower projects, life changing decisions being worked out (he, he I'll explain in a few weeks), keeping the ant attack of my kitchen at bay (the exterminator is coming next week!!! Thank God!!! they were winning the war!!!), and prepping my house for my 30th birthday/4th of July party on the 6th of July (my actual birthday) have all taken over my life.  

SOOOOOOOOO.......

Next week, hoping to work on my files while Little Bit recovers from her surgery (wish me luck!!!)

Have a great 4th of July (or 6th!) and catch back up with me after the craziness settles down.

Thursday, June 13, 2013

2nd project complete!

I just finished my second organization project off the summer! I am so proud of myself for following through with my plan this time... maybe I will become a grown-up one of these days :-P
Well, on to my project as promised. 
I stared off with my old set of  drawers that roll (used to roll until my husband broke off a wheel bringing it home for this project :-/).

Just a plain set of drawers
I selected the following paper to match the color scheme in my classroom.  I got this paper in a paper basics pack from Hobby Lobby.  They have all paper on sale for 50% off rigth now!!! A great find.
Don't you just love the colors and the mix of patterns?

Then I started to cut the paper and ended up cutting it about 10 times! My goal was a really tight fit and I kept adjusting until I was down to the dimensions listed below. Others have suggested using wax paper for doing this, I would have, but I was out at home :(
Large Sides: 3 x 11 1/2   Front large piece: 2 1/4 x 8 3/4  Short pieces: 1 1/4 x 2 3/4
Finally I began to add the paper to the drawers.  I started with placing "small pieces of tape" along the edge of the drawer as stated on other blogs were people have posted about this same project.  However, I had a small problem. You might not be able to see from the pictures, but the wide scotch tape I was using actually crinkled the paper and left messy looking tape all over the drawer.

Can you see the crinkled paper?

Looks Messy!!!

My next thought was to use Mod Podge, as suggested by another blog, but I was a bit afraid of the learning curve from this application, so... 
I brought out the big GUNS!!! As you may or may not know, I also love to scrapbook. As part of my supplies I have my favorite tool, my ATG gun, and when I say gun I mean GUN!!! Even though I may get made fun of at crops for how big it is, I love this tool and it was perfect for this project.
And don't you LOVE that it is pink!


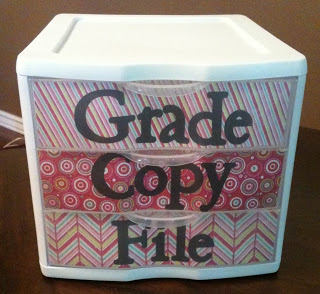
Here are the after pictures from using my ATG gun.  I love how clean the paper looks in each drawer.
Add a small amount of the strip of tape on all sides

Clean look on the outside


No extra tape on the inside!!!
Finished drawers


I love how it looks from the front

I like the side, but I might add a piece of paper in the small section I left empty.  This will be under my desk most of the time, so it won't really matter, but would just add to the look.

Finally, I added black vinyl for a crisp look to the letters.  I cut the font on my Cricut using Pooh Font. 


I have two drawers for "tools" as I call them with my students.  Since we don't have a traditional desk in my school, I will add organizers and put all my supplies in the top two drawers.  The rest are to keep myself, my co-teacher, subs and any paraprofessionals that come into my room organized and able to help out when needed.


I hope I could inspire you to update your storage units as well, next up...my many files (SHUTTER WITH FEAR! )

Sunday, June 9, 2013

Optimum Organization Linky Party

Thanks to my colleague Sarah at Third Grade Skinny-I am linking up with Kristen from Ladybug's Teacher Files for her Optimum Organization Linky Party!


This goes right along with my summer goal of organization!!! If you also would like to get more organized this summer to OPTIMIZE your new school year time, consider linking up!

My organization find for this week is a preview to the items I was going to share next week.  Below is a picture of what I hope to create with my own materials and my Cricut during the week.  I hope to have my own pictures and ideas to share and update this post next week.  Hopefully my 18 month old will cooperate with my organization plans ;-)

Adventures of 5th Grade

Hope you have a productive week!

Friday, June 7, 2013

Organization...My theme for next year!

 Organization, this has been my greatest downfall in my classroom.  I always have good intentions of how I will set up my classroom each year, and each year I fail.  I have even read Debbie Diller's book Spaces and Places in the hopes that it would help. (This is a great resource for ideas, and I highly recommend it!) Hopefully Debbie can help you come up with and follow her ideas for organization in your classroom.


But for me, I have several ideas about why this keeps happening...maybe because I have too many ideas on how to organize...maybe because of all the meetings that take over my life in August...maybe because I just need help to down size my stash...maybe all three...

Or maybe, I just need a better plan...

This summer I plan to organize a different part of my classroom before I return to set it all up. I will share my entire plan and journey on this blog all summer long, so you can join me and hopefully become inspired to do the same in your own way.

First up-My desk

I have a rather large L shaped built in desk without any drawers underneath (I will add a picture when I can get back up to take one).  Not having any drawers has made for quite a messy problem on a daily basis.  A few years ago I purchased a 22-drawer organizer.  I know WAY before they became popular. However, over the years it has become a bit shabby.  The labels were peeling off and it lacked creativity and finesse

My old "ugly" organization  toolbox


See ugly!!! 

So, I spray painted the whole box white and added the following labels.  You can purchase and print your own set from TPT here: Teacher Toolbox Labels

Here is the final product:

New clean looking toolbox

Top view: White top-might add a ribbon over the top and sides
 
Sorry they are such bad pictures, I need a better camera, but you can get an idea about what it looks like.  I used a small amount of tape to hold the labels in place.  I saw on one site where someone suggested that you laminate the paper first and then tape it in.  That would definitely help keep it from tearing in the future. However, my students almost never use this, so I am not too worried about that. 

As my first start at organization, my hope is that this small step will continue all school year.  

Next up: Organization for UNDER my desk...Stay tuned!